Difference between revisions of "Enemies"
Mindwitness (talk | contribs) m (Added a funny quote) |
Mindwitness (talk | contribs) (Added sprites of some new undead enemies and updated old) |
||
| Line 76: | Line 76: | ||
{| class="stoneshard valign-bottom cell-hover" style="text-align: center; margin: auto;" | {| class="stoneshard valign-bottom cell-hover" style="text-align: center; margin: auto;" | ||
!colspan=" | !colspan="4" | | ||
=== Nests & Hives === | === Nests & Hives === | ||
|- | |- | ||
|[[File:Deathstinger Hive.png|link=Deathstinger Hive|class=image2x]][[File:Deathstinger Hive2.png|link=Deathstinger Hive|class=image2x]]<br>[[File:Deathstinger Hive3.png|link=Deathstinger Hive|class=image2x]][[File:Deathstinger Hive4.png|link=Deathstinger Hive|class=image2x]]<br><b>[[Deathstinger Hive]]</b> | |[[File:Deathstinger Hive.png|link=Deathstinger Hive|class=image2x]][[File:Deathstinger Hive2.png|link=Deathstinger Hive|class=image2x]]<br>[[File:Deathstinger Hive3.png|link=Deathstinger Hive|class=image2x]][[File:Deathstinger Hive4.png|link=Deathstinger Hive|class=image2x]]<br><b>[[Deathstinger Hive]]</b> | ||
|[[File:Harpies Nest.png|link=Harpies Nest|class=image2x]][[File:Harpies Nest2.png|link=Harpies Nest|class=image2x]]<br>[[File:Harpies Nest3.png|link=Harpies Nest|class=image2x]][[File:Harpies Nest4.png|link=Harpies Nest|class=image2x]]<br>[[File:Harpies Nest5.png|link=Harpies Nest|class=image2x]]<br><b>[[Harpies Nest]]</b> | |||
|- | |||
|[[File:Crawler Burrow.png|link=Crawler Burrow|class=image2x]][[File:Crawler Burrow2.png|link=Crawler Burrow|class=image2x]]<br>[[File:Crawler Burrow3.png|link=Crawler Burrow|class=image2x]]<br><b>[[Crawler Burrow]]</b> | |[[File:Crawler Burrow.png|link=Crawler Burrow|class=image2x]][[File:Crawler Burrow2.png|link=Crawler Burrow|class=image2x]]<br>[[File:Crawler Burrow3.png|link=Crawler Burrow|class=image2x]]<br><b>[[Crawler Burrow]]</b> | ||
|[[File: | |[[File:Soul Well.png|link=Soul Well|class=image2x]]<br><b>[[Soul Well]]</b> | ||
|- | |- | ||
|} | |} | ||
| Line 158: | Line 160: | ||
|[[File:Beast Trapper.png|link=Beast Trapper|class=image2x]]<br><b>[[Beast Trapper]]</b> | |[[File:Beast Trapper.png|link=Beast Trapper|class=image2x]]<br><b>[[Beast Trapper]]</b> | ||
|- | |- | ||
|[[File:Rogue Knight (Sword).png|link=Rogue Knight (Sword)|class=image2x]]<br><b>[[Rogue Knight (Sword)|Rogue Knight]]</b> | |[[File:Rogue Knight (Sword)-2.png|link=Rogue Knight (Sword)|class=image2x]]<br><b>[[Rogue Knight (Sword)|Rogue Knight]]</b> | ||
|[[File:Rogue Knight (Two-Handed Sword).png|link=Rogue Knight (Two-Handed Sword)|class=image2x]]<br><b>[[Rogue Knight (Two-Handed Sword)|Rogue Knight]]</b> | |[[File:Rogue Knight (Two-Handed Sword).png|link=Rogue Knight (Two-Handed Sword)|class=image2x]]<br><b>[[Rogue Knight (Two-Handed Sword)|Rogue Knight]]</b> | ||
|[[File:Paymaster.png|link=Paymaster|class=image2x]]<br><b>[[Paymaster]]</b> | |[[File:Paymaster.png|link=Paymaster|class=image2x]]<br><b>[[Paymaster]]</b> | ||
| Line 237: | Line 239: | ||
|[[File:Wraith Commander.png|link=Wraith Commander|class=image2x]]<br><b>[[Wraith Commander]]</b> | |[[File:Wraith Commander.png|link=Wraith Commander|class=image2x]]<br><b>[[Wraith Commander]]</b> | ||
|- | |- | ||
|style="vertical-align: middle;" rowspan= | |style="vertical-align: middle;" rowspan=3|'''Mini-Bosses''' | ||
|[[File:Occultist.png|link=Occultist|class=image2x]]<br><b>[[Occultist|Occultist]]</b> | |[[File:Occultist.png|link=Occultist|class=image2x]]<br><b>[[Occultist|Occultist]]</b> | ||
|[[File:Necromancer (Staff).png|link=Necromancer (Staff)|class=image2x]]<br><b>[[Necromancer (Staff)|Necromancer]]</b> | |[[File:Necromancer (Staff).png|link=Necromancer (Staff)|class=image2x]]<br><b>[[Necromancer (Staff)|Necromancer]]</b> | ||
|[[File:Ritualist.png|link=Ritualist|class=image2x]]<br><b>[[Ritualist]]</b> | |[[File:Ritualist.png|link=Ritualist|class=image2x]]<br><b>[[Ritualist]]</b> | ||
|[[File:Skeleton Kingsguard (Spear).png|link=Skeleton Kingsguard (Spear)|class=image2x]]<br><b>[[Skeleton Kingsguard (Spear)|Skeleton Kingsguard]]</b> | |[[File:Skeleton Kingsguard (Spear)-2.png|link=Skeleton Kingsguard (Spear)|class=image2x]]<br><b>[[Skeleton Kingsguard (Spear)|Skeleton Kingsguard]]</b> | ||
|[[File:Skeleton Kingsguard (Sword).png|link=Skeleton Kingsguard (Sword)|class=image2x]]<br><b>[[Skeleton Kingsguard (Sword)|Skeleton Kingsguard]]</b> | |[[File:Skeleton Kingsguard (Sword)-2.png|link=Skeleton Kingsguard (Sword)|class=image2x]]<br><b>[[Skeleton Kingsguard (Sword)|Skeleton Kingsguard]]</b> | ||
|[[File:Skeleton Kingsguard (Mace).png|link=Skeleton Kingsguard (Mace)|class=image2x]]<br><b>[[Skeleton Kingsguard (Mace)|Skeleton Kingsguard]]</b> | |[[File:Skeleton Kingsguard (Mace).png|link=Skeleton Kingsguard (Mace)|class=image2x]]<br><b>[[Skeleton Kingsguard (Mace)|Skeleton Kingsguard]]</b> | ||
|- | |- | ||
|[[File:Skeleton Kingsguard (Two-Handed Axe).png|link=Skeleton Kingsguard (Two-Handed Axe)|class=image2x]]<br><b>[[Skeleton Kingsguard (Two-Handed Axe)|Skeleton Kingsguard]]</b> | |[[File:Skeleton Kingsguard (Two-Handed Axe).png|link=Skeleton Kingsguard (Two-Handed Axe)|class=image2x]]<br><b>[[Skeleton Kingsguard (Two-Handed Axe)|Skeleton Kingsguard]]</b> | ||
|[[File:Archivist.png|link=Archivist|class=image2x]]<br><b>[[Archivist]]</b> | |||
|[[File:Undertaker.png|link=Undertaker|class=image2x]]<br><b>[[Undertaker]]</b> | |||
|[[File:Revenant Commander.png|link=Revenant Commander|class=image2x]]<br><b>[[Revenant Commander]]</b> | |[[File:Revenant Commander.png|link=Revenant Commander|class=image2x]]<br><b>[[Revenant Commander]]</b> | ||
|[[File:Wraithbinder.png|link=Wraithbinder|class=image2x]]<br><b>[[Wraithbinder]]</b> | |[[File:Wraithbinder.png|link=Wraithbinder|class=image2x]]<br><b>[[Wraithbinder]]</b> | ||
|[[File:Restless Hero.png|link=Restless Hero|class=image2x]]<br><b>[[Restless Hero]]</b> | |||
|- | |||
|[[File:S husk.png|link=Armored Husk|class=image2x]]<br><b>[[Armored Husk]]</b> | |||
|[[File:Spectral Herald.png|link=Spectral Herald|class=image2x]]<br><b>[[Spectral Herald]]</b> | |||
|???</b> | |||
|???</b> | |||
|} | |} | ||
Revision as of 21:19, 20 December 2024
Animals
| “ | The animals are divided into: a — those belonging to the Emperor, b — embalmed ones, c — trained ones, d — suckling pigs, e — sirens, f — fabled ones, g — stray dogs, h — those included in this classification, i — those that tremble as if they were mad, j — innumerable ones, k — those drawn with a very fine camel hair brush, l — et cetera, m — those that have just broken the vase, n — those that from afar look like flies. | „ |
| ~ Celestial Emporium of Benevolent Knowledge |
Animals are NPCs that roam the plains, forests, and other biomes. Sometimes, they fight with each other or wait until prey enters their field of vision.
Harmless Animals are mobs that will run away when they see or hear a player character. Most of them have valuable horns or pelts that can be harvested with Skinning from Survival skill tree.
Harmless Animals | |||||||||
|---|---|---|---|---|---|---|---|---|---|
Bunting |
Deer |
Fox |
Hedgehog |
Jay |
Mallard |
Rabbit |
Raven |
 Saiga |
Squirrel |
Sparrow |
Swallow |
Tit |
Thrush |
Wren |
 Horse |
Pig |
Sheep |
Chicken |
Rooster |
Seagull |
Pigeon | ||||||||
Hostile Animals are mobs that will become suspicious when they hear or see a player and will hold their position and try to scare the player away by making specific sound and animation. If the player stays in their close proximity for too long or comes too close, these animals will also enter the Hostile state. Otherwise, if player leaves their close proximity quickly enough, the animals will go back to the Unaware state.
Hostile Animals | |||||||||
|---|---|---|---|---|---|---|---|---|---|
 Bear |
Boar |
 Bison |
Crawler |
Deathstinger Swarm |
Dungeon Bat |
Forest Viper |
Giant Rat |
Harpy |
 Moose |
Wolf |
Gulon |
 Young Troll | |||||||
Bosses are unique mobs that appear only once per playthrough and have unique quest for killing them, they are distinctly more dangerous and tougher than other mobs, they provide unique challenges but also equivalent rewards. With Skinning they can drop unique expensive loot, for example Troll Pelt from Ancient Troll.
Bosses | |||||||||
|---|---|---|---|---|---|---|---|---|---|
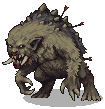 Ancient Troll |
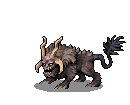 Manticore |
 Ascended Archon | |||||||
Nests & Hives are creatures that appear in some Points of Interest, they are surrounded by relevant mobs, Hives surrounded by Deathstinger Swarm and etc. They will eventually spawn mobs, some of them will do it in short period of time, some of them will do it after a lot of time has passed.
Nests & Hives | |||
|---|---|---|---|
   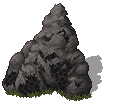 Deathstinger Hive |
     Harpies Nest | ||
   Crawler Burrow |
 Soul Well | ||
Enemies
Enemies are all creatures that will attack you on sight. There are many different kinds of enemies and each comes with their own set of priorities and Skills they can use. Enemies of a certain type cooperate together (for example, Wolves form packs), but they may not cooperate with enemies of a different type (for example, Wolves and Bandits will attack each other). Brigands are the only type of Enemies that can spawn on the surface, with the exception of Ghouls.
Secret Cults (Proselytes) | |||||||||||
|---|---|---|---|---|---|---|---|---|---|---|---|
| 1-5 lvl |  Cultist |
Dead Martyr |
Harbinger |
 Tormentor |
 Adept |
 Immolated | |||||
Martyr | |||||||||||
| 6-10 lvl | Leechworm |
Tentacle Arm |
 Chosen |
 Toller |
 Sanguimage |
Blood Golem | |||||
 Outcast |
Flagellant | ||||||||||
| 11-15 lvl | Saggul |
Impaler |
Girrud | ||||||||
| 16-20 lvl |  Fiend |
Yagram |
Murkstalker | |||||||
| Mini-Bosses |  Apostate |
Matriarch |
Abomination |
 Brander |
 Wormbearer |
 Anmarrak | |||||
 Juggernaut | |||||||||||
Page last edited during patch: 0.9.1.0
| ||||||||||||||||||||||||||||
| |||||
